 I love when you get to that point in a project where you can see the light at the end of the tunnel. Even better when you can tell it isn't a train! :) So here's the details on the details. Pardon the LOADS of pictures. It's hard to get good photos of a 6 foot board! :)
 Begin by using your speed square to find the nice straight line of the bottom. Then use your ruler to start measuring up each inch from there. This is where you use a pencil. But write LIGHTLY, in case you do need to erase.
 Slowly work your way up the board, just marking the inches. I chose to put mine in the middle of the board so that the measurements of my boys could be on either edge. That was totally personal preference. Do what works for you.
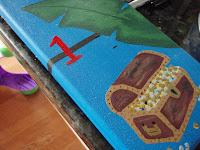
 Then you need to go back and count out your foot lines. See behind the X that marks the spot how there is a dark line? That's my foot marker. Also notice how it is NOT at the edge of the board. I know that I want to hang my board above my baseboards. This means I need to start my chart at something greater than 4 inches. I chose 6 because it made more sense to me. So I counted up 6 inches to my FIRST foot mark and made that 1. Make sense?
 In places where the foot marks fell on an image, I ran the line like it was actually behind it, though it wasn't. I guess you could have done your measurements FIRST and then your decorations so that they would actually be ON TOP, but that's a personal preference too. You'll also notice from this picture how I added the numbers (freehand, though you could print out a font to copy) OVER the lines in red paint.

 Then I added the boat we made earlier in the week. Hot glue, baby, hot glue.
 And I transfered the measurements (along with dates) for the boys so far. I got these from the pediatrian's report cards. I LOVE our pediatrian! :)
 Then I decided it needed more bling. So I used some glitter glue to make my bouty chest more "treasure" and less "paint". It also gave it an extra tactile thing for the boys to enjoy now while they are small and close to the floor.
 At this point, we were all pretty done, so it was bed time. No hanging of the chart, as the boys prefer no drilling in their walls while they are sleeping. Party poopers. :) So tomorrow, we HANG IT, baby!
3 comments:
Thanks for stopping by my blog. Cool to see another ATL mom indeed. LOVE this growth chart. I definitely need one for my little girl. You have a new follower!
Aaak, sorry for the double comment, but I just saw your Etsy shope and OMG! I lovelovelovelove the Alice in Wonderland stuff! I just stitched out all the Alice stuff from Urban Threads and have been trying to think of what to do with it. I decided on potholders but I should have been thinking garments. Your stuff is INCREDIBLE - I love how you used different colors and put the queen on that shrug. Amazing.
I am SOOO flattered! Your stuff is awesome and I love your blog! I'm so glad you darted over here AND to my etsy! Thank you so much!
And don't you just LOVE UrbanThreads!!! :)
Post a Comment